Wednesday, October 10, 2012

Zucchini, Potato, and Squash Casserole

Lately I have felt like I am in a food rut!  Pasta, potatoes, tacos...blah.  All of those foods are good in and of themselves, but sometimes you just have to do something different! Plus, it's now FALL!  Boots & leggings time! And comfort food time.  

 Last Friday my husband stopped by Boa Vista orchards on the way home from work.  We have the privilege of living 15 minutes from Apple Hill, a wonderful area of orchards and vendors just beyond Placerville on the way to Lake Tahoe.  For $11, he picked up a good amount of apples, squash, zucchini, and potatoes!  Since we aren't able to eat everything in one day, I needed to use up some of the vegetables for dinner this week.  I decided to try and make a casserole/layered vegetable dish.  This is completely made up and ended up being quite tasty.  It's super-easy to put together on a weeknight OR on a weekend for a side dish for entertaining!  Here goes:


Cheesy Zucchini, Potato, and Squash layer/casserole 

Servings:  3-4 at least.  Use more ingredients for a thicker casserole but keep in mind baking time will be longer to cook through

Sliced Zucchini (1-2)
Sliced Yellow squash (1-2)
Sliced Russet Potatoes (2-3)
Shredded cheddar cheese (I used a block cheese and shredded it)
Salt, pepper, herbs, garlic powder, etc.
Olive oil
1-2 bullion cubes dissolved in a few tablespoons of hot water
Chopped fresh shallots or onions

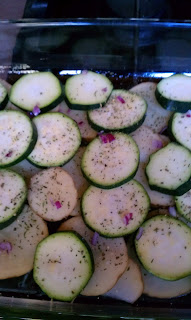
Directions:  Super easy.  Preheat oven to 400 degrees.  Spread a very thin layer of olive oil on the bottom of a large baking dish (9x13).  Begin with a layer of potatoes.  Sprinkle with salt, pepper, herbs, and all seasonings of your choice.  Add some layers of zucchini and squash.  Season as you go on each layer.  

I also sprinkled finely-diced onions on the vegetables:

Top the veggies with shredded cheese, the amount up to your personal preference.  I used a brand from Safeway called Open Nature, mild cheddar cheese. It melts very smooth and it's also not dyed any yellow or orange color, so it comes out white and very natural looking:

Continue to layer until a few times. On your last layer of choice, use the shredded cheese as the last item as it will melt and brown very nicely. 
The next step is to take the bullion that you have dissolved in a few tablespoons of very hot water and sprinkle it evenly on top, letting the liquid drip through the veggies.  I used my favorite Rapunzel salt-free vegan bullion:


Yum!

Cover with foil and bake at 400 degrees for at least 15 minutes.  I'm such a throw-together cook, I don't monitor my cook times as well as I should, so I'm sorry it's not perfectly accurate.  I used a fork to check the softness of the potatoes.  At the very end, I set my oven on BROIL for just a few minutes to get that nice golden-brown crust on the cheese and veggies.  

The finished product looks like this:


We just ate this as is, but you could serve with some crusty bread and a salad for a great vegetarian dinner.  Or, use this dish as a tasty side for entrees.  If you prefer more creaminess, a roux-based cheese sauce made with a little flour, butter, cream cheese, and shredded cheese of your choice would be great!  Perfect for those chilly fall days.  


Wednesday, September 26, 2012

Cassie Craves: Macaroni and Cheese-Stuffed Tomatoes

Here's a fantastic looking recipe!

Cassie Craves: Macaroni and Cheese-Stuffed Tomatoes: Ever since I was a little girl, I've loved eating macaroni and cheese with a side of sliced and salted tomatoes. I don't know what it is I e...

Thursday, July 5, 2012

Roasted Red Pepper YUM

Lately we have been eating a lot of homemade sandwich spreads, whether it be hummus or red pepper.  It has so nicely elimitated the need for cheese or faux lunchmeat on sandwiches, which saves me $ on groceries and is healthier.  I'm going to apologize in advance for no pictures.  I have had such a bad habit of not taking enough pictures because I'm always cooking these things on the fly.  One interesting fact:  I usually HATE red peppers, roasted or raw.  I absolutely loved this spread, and roasting the pepper at home makes such a difference.  Here goes:

Roasted Red Pepper spread
 (adjust amounts according to how much you need)

1 Red Bell pepper
Sundried tomatoes (I use Trader Joe's, dried, not packed in oil)
Olive Oil
Italian Seasoning
Salt
Ground black pepper
2-3 cloves garlic (or less if you are sensitive to it)
Lemon

Easy Directions:

Cut the pepper into relatively flat pieces.  Line a baking sheet with aluminum foil and turn the broiler setting on in the oven.  Place the pepper pieces on the baking sheet and place about 4 inches from the broiler and roast for about 10 minutes.  The pepper pieces should have the lovely black crisp on them and the smell is amazing. 

Take the pepper pieces out of the oven and place them on a plate.  Cover the plate tightly with plastic wrap for about 15 minutes.  This will allow the skin to cool and it will peel right off.

Blend the peeled pepper with a handful of sundried tomatoes, seasonings to taste (I'm very generous with the italian seasoning), about a tablespoon or so of lemon juice, the garlic cloves, and olive oil.  I don't measure the olive oil exactly.  I usually gauge how much I put in by the texture the mixture is blending to.  I like the spread to slightly resemble pesto (a little oily with some texture). 

This will keep for a couple days in the fridge.  It is delicious on sandwiches, or you could use it for pasta or protein entrees.  Enjoy!


Monday, April 30, 2012

EASY awesome HOMEMADE calzones!

So this weekend was crazy active!  Sunday morning we were up at 7:00 to go golfing from 8-12, and then we came home and tried to take a short nap and then cleaned the entire house upside down.  Adding to that we went out for an errand and BOY did I NOT feel like cooking when I got home, but we had already eaten lunch out earlier and I'm not keen on eating out more than once a day unless we're on vacation.  So we tried something fun and different for dinner:  homemade Calzone!  Using my favorite Fleischmann's Pizza Yeast, I made one packet recipe of dough and it was just scrumptious.  Thanks to Dwight for helping put the Calzone together! 

Here's the easy recipe:


1 package Fleischmann's Pizza Yeast
Lots of Italian Seasoning/ herbs (no measurements, just however much you love!)
Lots of fresh chopped garlic
Cheese
Olives
Olive Oil
Parmesan cheese
Butler soy Curls (or chicken, whatever you prefer)
Sauce
Any other toppings/ fillings you like

Instructions:

Follow the Pizza yeast directions for one batch, on the back of the packet.  The only revisions I make are adding lots of fresh rosemary chopped and/or lots of dry italian seasoning and also use a little extra salt so the dough isn't so bland.

Stretch the dough out to an even thickness and start with spreading sauce, then add all of the other toppings and fold dough over, pinching corners together to stick.  My husband was so nice to do this part for me!  The wrestlin' of the dough:-)

Spray a rectangular cookie sheet/baking pan and transfer the huge hot-pocket (that's what it reminded me of) on the pan.  Brush the top with olive oil (this part is very important because it helps the calzone come out crispier & browned), sprinkle with parmesan cheese, and a little extra salt and herbs if you like.

Bake from 400- 425 until golden.  I baked it at 425 for about 6 minutes on the lower rack, then transferred to middle rack and baked on 400 until golden brown, just kept an eye on it and made sure it didn't burn.

Soooo easy & soooo delicious! 

This recipe makes plenty for two.  A Calzone of this size easily could cost $20 at a restaurant, $14 bargain priced.  I think my ingredients might have totaled $5.00 at the most.  Here's what I had to look forward to for lunch today:


And here's how yummy it looks on the plate:


Enjoy!:)


Wednesday, March 21, 2012

Trying Foods i HATE

So I have not blogged for a long time!  I have been trying to update my blog name and take more pictures.  Hopefully I'll be back in the swing of things shortly.  For today, I wanted to share a simple and yummy healthy recipe I threw together for work lunch today.  I have decided to try to incorporate foods I do NOT like the taste of, but are highly nutritional, in order to not miss out on any more nutrients!  So this week I am trying bell peppers.  I abhore them, especially raw--which will be my next step.  For today, I lightly cooked red bell peppers and later this week I will try a yellow bell pepper ...*gasp* RAW.  I am probably going to get some vegan ranch to go with it.  Here's today's easy recipe:


Cooked brown rice
Red bell pepper (1)
Soy Sauce
Veggie sausage or tofu

Sautee the red bell peppers, sliced into strips, in some olive oil & add soy sauce for flavor.  Add the tofu or veggie sausage as well.  Sautee only until the bell peppers are just cooked.  Add to the cooked rice & you have a quick, easy rice bowl packed with good nutrition.


Friday, February 24, 2012

Kitchen Klutz!

I would love to someday be considered a gourmet cook.  But sometimes I wonder if it skipped me to be a SAFE cook!  Before I got married, I lived at home with family and had an expert Grandma and mom cook that I should have definately soaked up more advice from and time with in the kitchen.  But since that didn't happen for one reason or another (school, relationship, having FUN out of the house), I ended up starting to cook a few years into my relationship with Dwight.  I'd make Thanksgiving dinner, Christmas dinner, and occasional recipes.  Then after marriage, being on my own forced me to try it all.   I've realized that even though my food comes out good, there's often some mistakes or general klutziness that happens before the finished product. 

Of course, the standard set-the-fire-alarm off has happened to many.  But I wonder if any of you have left your stove burner ever so slightly on, so that gas leaks out?  Mmm-hmm, I'm guilty.  The scariest part of that incident is that I returned home from work around 5:00 pm the NEXT day, to realize my whole apartment smelled like gas and that we'd slept with the burner slightly on.  SCARY!  After a panicky call to my husband at his work, I aired out the place and went promply to Home Depot to buy a gas detector.  Of course I got teased with the "you tried to kill us!!" from my husband, but he was so calm and sweet about it.  Phew! So this may explain my current OCD with checking all of my burners every night. 

Significant kitchen mishap #2:  I learned real quick that potato peels and garbage disposals are NOT friends.  I peeled enough potatos to make a large pyrex baking dish of cubed potatos with sausage.  One of my favorite, delicious dishes and so easy to make.  Except that I peeled TONS of potatos and figured, "whatever, gotta get rid of 'um somehow," and proceeded to turn on my garbage disposal only to make a gross pond of brownish water in my sink.  This gave me anxiety through the roof, because we were moving from our aparment in three weeks and the last thing I wanted was a broken garbage disposal or a plumber bill.  Thank goodness for google and my husband--I learned from google that it is a plumber's nightmare and I learned from my husband that I should tell everyone to marry a handyman!  Gahhh! Lesson learned.

However, my most scary and ridiculously idiotic mishap came after we just moved into our new rental house.  We now have the old school coil electric stove, instead of the gas burners that almost snuffed us out in our old apartment (!!).  And we also have no microwave.  This combination proved fatal to my awesome large pyrex mixing bowl.  I was mixing together a quick batch of homemade chocolate-chip cookies to bring to my parents' for lunch, and when it came time to add butter, I realized it wasn't soft enough.  So, foregoing logical thought, I dropped a stick of butter into my pyrex mixing bowl, cranked the coils up to HIGH, and figured, "oh it'll just take a sec to melt this butter down a bit."  I placed the pyrex on the stovetop, and within what felt like seconds of me turning away from the stove, I heard a POP!! and turned around to see that my pyrex was completely blown to shards, and butter was promptly melting on the stovetop. 

*Sigh.*

The worst part of the ordeal was not losing my pyrex, or having my husband stifle laughter because I was very emotionally disturbed by my mistake.  It was leaving the lid to a delicious homemade pot of soup off to let it cool. 

The soup was right next to the pyrex.  Yup, go figure.  The soup had to be thrown away because the shards were small in some spots and I cut myself just trying to clean them up. 

At least we'd already eaten big bowls of the soup for dinner that night before I decided to blow glass up at random!

Well, on a positive note, I've taken these random "lessons" to heart and these particular mistakes won't be repeated.  I've decided to not let my klutziness and general airheaded demeanor not get in the way of my love for food and cooking.  Let's just hope these adventures diminish in frequency over time!

:-)

Wednesday, February 22, 2012

KITCHEN MUST haves!

So I thought I would share some of my favorite things that I absolutely have to have on hand in my kitchen.  Of course there are lots of other essentials BUT in the interest of time & keeping it simple, here are a few:


VEGAN BOULLION:  This is Rapunzel vegan boullion.  I've included the actual cubes in this photo so you can see the size.  These sell at Whole Foods, usually 2 for $5.00.  At a regular health food store, they are closer to $4 for just one package, but still worth it.   I use these for oven baked potatoes with sausage, every soup, kale or chard cooked stovetop, and more.  The no salt version actually has plenty of  flavor so it cuts down the need for salt, plus you can control how much salt goes in!  Love this and always keep it on hand.  


OATMEAL BAGGIES: This has been my creative breakfast attempt/moneysaver.  I simply buy any kind of old fashioned oats, measure out one serving, add a small bit of organic sugar and cinnamon, and voila!  Inexpensive, individual serve oatmeals for breakfast that are a lifesaver for hubby and I!  I also reuse the bags by washing them, since they never get wet, with some nice hot water & soap and drying them out right away.  I like to get these baggies put together at the beginning of every week so I have less work to do putting together breakfasts during busy weekdays!


BUTLER SOY CURLS:  So these are a soy-protein "chickn" subsitute.  I recently bought them bulk with my mom for $30 each, and we got 12 pounds!  Six pounds  (for $30) has lasted me for ever in the freezer and they are so easy to prepare for tacos, pasta, stirfry, and more.  I simply reconstitute them in hot water for about 15 minutes, drain, and fry up with some olive oil or butter.  Adding chicken style seasoning, broth, taco seasoning, etc.  works great.  These take on most flavors very well.  For more info, google "Butler Soy Curls."  


EWHITE VINEGAR:  So this is a recent discovery.  I keep this on hand (had it before for some potato pancakes but never used it again) NOW, as of a few weeks ago, because of a wonderful recipe for vegan muffins I discovered by googling.  More to come on that recipe in another post:-).  1 tablespoon of vinegar replaces EGGS for 12 vegan muffins.  YES, I said EGGS.  This is not only a CHEAP solution but a healthier choice if you are watching your diet or simply eliminating dairy products.  You can use any white vinegar, this isn't an endorsement for the brand--it's just what I had on hand.  Trust me, fluffy and delicious muffins, all with ONE tablespoon of this stuff.  MUST HAVE:-)  Sorry for the ugly hand/fingers.  Crazy hot water will do that to ya!:-)


WHITE WINE:  So this one is self explanatory.  Once again, not a brand endorsement just a cheap and useful white wine.  Since Dwight and I don't drink, I use this inexpensive white wine to deglaze the bottom of my pot when making soup (fantastic recipe for a tomato, white bean, crimini mushroom soup started me on this!), as well as to make white wine butter lemon sauce for pasta.  I still need to perfect cooking with this, but I will always keep a cheap bottle on hand for recipes!  This one probably only set me back about $6.  


So once again this isn't extensive but I didn't want to be too detailed!  What are some of the things you can't live without in the pantry and fridge?  


Time to Update! Veggie Burgers!

Ok, it has been FAR too long since I've posted on this blog.  Sometimes it's hard to be motivated to keep up.  However, inspired by my recent obsession with all things home-made, I have decided to start posting more of my day-to-day adventures in cooking, baking, and just generally being more crafty and resourceful around the house.  Couponing has helped me to save money when I shop, but cooking home-made things that usually can be bought at the store has become my most recent challenge!  So, without further wordiness, I'd like to post the first home-made HIT recipe from my MOM, for the most finnicky of eaters!  This is her recipe for vegetarian burgers and it is FANTASTIC.  Meat cravings, OUT the window!:-)  Well, hopefully;-)


Ok so I said I'd post the recipe, this is COURTESY OF MY MOMMA! Thanks MOM! :-)  These burgers are the PERFECT burgers to impress any meat lover with.  You can add extra sliced cheese or just dress with tomato & lettuce and your favorite toppings...its good cheeseburger style or not and it has cheese built right in anyway!:) Here goes:


Oat-Nut Burgers

4 cups water
4 cups old fashioned rolled oats (not the quick cook kind)
1/2 cup soy sauce (or tamari--I use tamari because its so rich in flavor)
1/3 cup veg. oil
1 cup chopped nuts (i used pecans for the richness but walnuts or a mix will be fine)
1/4 cup nutritional yeast flakes (the best brand of these is Red star, found in bulk section of whole foods and some natural foods stores)
chikn/beef like seasoning to taste (this can be salty so test it out--maybe a tablespoon)
1 tsp bakon seasoning (optional)
1 TBSP italian seasoning
2 tsp garlic powder
2 tsp onion powder
1 tsp rubbed sage
1 tsp thyme
2 beaten eggs or egg replacer
1 cup grated vegan or regular cheddar cheese

Place all ingredients except oats, nuts, cheese, & eggs in a large pan.  Stir & bring to a boil over medium heat.  Stir in oats & remove from heat ASAP.  Cover and set aside to thicken and cool enough to handle (this will just be something you have to check on and see when its cool enough to not scramble the eggs).  Add cheese, beaten eggs, and nuts.

Preheat oven to 350.  Use parchment paper or a sprayed baking sheet and bake about 1/2 hour on each side.